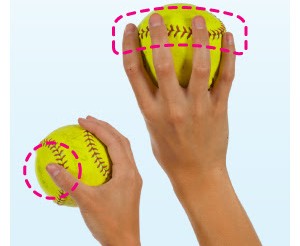
Proper Four-Seam Softball Grip Mechanics
Fundamental throwing accuracy foundation

Age
- 6U
- 8U
- 10U
Time
- 10 min
- or longer
Players
- 1 player
- 2 player
- Team
Equipment
Required
- Balls
Optional
- Permanent marker
How to Set It Up
- Walk through:
Show the players a proper grip in a huddle. - Visual markup:
Draw thick lines over the C-shaped seams with a marker beforehand.
This helps young players spot the correct finger placement.
Younger kids will not be able to place their pinky on a seam. - Player layout:
Place them in a line about 3 feet apart each with a ball. - Ball placement:
How to Run the Drill
- Horseshoe identification:
Tell players to pick up the ball and find the seam. - Three-finger placement:
Have players lay index, middle, and ring fingers across the top seam.
Young 6U players need three fingers across the seam for proper control. - Thumb positioning:
Place the thumb directly underneath the ball on the bottom seam. - Palm gap check:
Verify there is space between the ball and the center of the palm.
The ball should rest on the pads of the fingers, not flat in the hand. - Show and check:
Have players hold the ball high in the air.
Walk the line to inspect and adjust grips for each player. - Repeat:
Have players place the ball on the ground, then pick it up and quickly find the grip.
Coaching Tips and Variations
- Three-finger modification:
Use three fingers on top for small 6U hands. - Toss and grip game:
Have players toss the ball short into the air and catch it.
Challenge them to adjust to a four-seam grip as fast as possible. - Eyes-closed feel:
Ask players to close their eyes and rotate the ball in their hand.
Teaches players to feel the seams without looking down during games. - Color visual cues:
Mark the top seam red and the bottom thumb location blue.
Simplifies instructions to put red on top and blue on bottom.
Leave a Reply